Where Is The Format Tab In Word For Mac
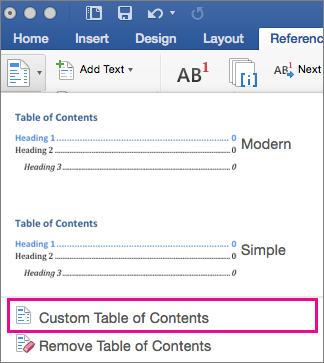
Page Margins Page margins are the white space around the top, bottom, left, and right of your document. Margins let Word know where to start placing text at the top of a document, when to move on to the next page at the bottom, where to start typing text on the left side, and where to stop and move to the next line on the right. Changing or setting page margins in Word 2016 only requires a few simple steps. It really doesn't take any time at all once you know where to go and what to do.  To change or set the page margins, click the Layout tab on the ribbon, then go to the Page Setup group. Click the Margins button. It looks like this: Normal margins are one inch margins at the top, bottom, left, and right. To set your own margin, click Custom Margins at the bottom of the dropdown menu.
You will then see the Page Setup dialogue box. Enter the margin measurement in inches for the top, bottom, left, and right margins. How to Change the Orientation of a Page When we talk about page orientation, there are two different orientations: landscape and portrait. Landscape and portrait refer to how the document will be displayed on screen and printed. Choose Landscape and your document will be printed horizontally. This is the most common orientation. Vegas pro 14 mac torrent. If you select Portrait, it will be printed from top to bottom (vertically). This is best for professional photos of several people. If your document contains several photos, you may want to choose Portrait.
Tutorial for formatting a manuscript for APA style rules using Word 2011 for Mac. Subtitles available: click on the CC button toward the bottom right of the video. In this screen cast, I will explain how to quickly and easily make custom tabs and indents using the horizontal ruler in Microsoft Word on a Mac.
To set the orientation, go to the Layout tab. Click the dropdown arrow below the Orientation button. It looks like this. Page Colors Changing the page color is self-explanatory.
To do so, click the Design tab and then the Page Color button. Simply select a color from the menu.
To create your own color, click 'More Colors.' Under the Standard tab, you can click on a color to select it, as shown above. If you click the Custom tab, you can use the color picker by clicking your mouse anywhere on the color that you want, then use the slider to adjust the color to create the exact shade you want.
To add a gradient, texture, pattern, or picture, click 'Fill Effects' in the Page Color dropdown menu. Want to learn more? Borders can be applied to an entire page, an entire document, or just certain sections of the document. A border can also be applied to paragraphs. To put a border around a page or a paragraph, go to the Design tab and click the Page Borders button in the Page Background group. It looks like this: When you click the Page Borders button, a new dialogue box opens.
Use this window to define the attributes of your border. You can choose to remove a border by clicking the None box. Select a style, width, and color. You can even select some predefined artwork from the Art dropdown box. Using the Apply To dropdown, you can choose whether to apply these settings to the entire document or just certain pages or sections.