Format For Pc And Mac Disk Utility
Sidify drm audio converter. Sidify Apple Music Converter is a well-designed audio converter for iTunes music for Mac users. It can remove DRM from Apple music songs It is a simple application that any user must get the fall in moments. All you need to do is add the songs you want to convert and select the desired output format. You can use Sidify Apple Music Converter Crack to convert audiobooks and M4P music. With an innovative recording technique, Sidify Apple Music Converter Torrent can convert 5X faster speed when Has Windows and Mac versions. Easy and concise interface. Compatible with Windows apps. Convert Apple Music songs to plain MP3 and AAC. Record Apple Music streams with 100% lossless quality. 20X faster conversion speed. Highly compatible with MacOS High Siera & the latest version of iTunes. Mac Sidify Apple Music Converter 1.3 Crack – Download.
Jan 26, 2018 - Or it might be that you bought a drive to use with your Mac only to discovered it is pre-formatted for Windows. Fortunately Disk Utility, built right.
• In the Disk Utility app on your Mac, choose View > Show All Devices. • In the sidebar, select the disk or volume that you want to format to use with Windows computers. • Click the Erase button, click the Format pop-up menu, then choose one of the following: • MS-DOS (FAT): Choose if the size of the disk is 32 GB or less. • ExFAT: Choose if the size of the disk is over 32 GB. • Enter a name for the volume. The maximum length for the volume name is 11 characters. • Click Erase, then click Done.
You can also using the Master Boot Record partition layout, which is compatible with Windows.
Avast check for mac. Good antivirus software should also use minimal computational resources. How we test Each software package is evaluated creating a clean installation of High Sierra, cloning it for each AV product, and then booting separately into each one to install a different package. Some AV software are full-fledged suites that offer additional options like backup service for essential files, a password manager, parental controls, anti-tracking and privacy modes or options, a more advanced firewall, and the blocking of Potentially Unwanted Applications (PUAs). That’s especially the case these days—AV monitoring hasn’t become much more complicated than when it first became available, and faster, multi-core CPUs can easily handle the demands of running AV software in the background without disturbing your active work. Beyond these primary features, an easy-to-navigate interface and extra features are worth factoring into your decision.
Accessing Disk Utility RELATED: To access the Disk Utility in macOS, just press Command+Space to open, type “Disk Utility” into the search box, and then press Enter. You can also click the Launchpad icon on your dock, click the Other folder, and then click Disk Utility. Or, open a Finder window, click Applications in the sidebar, double-click the Utilities folder, and then double-click Disk Utility. RELATED: To access the Disk Utility on a modern Mac—regardless of whether it even has an operating system installed—reboot or boot up the Mac and hold Command+R as it boots. It’ll, and you can click Disk Utility to open it up.
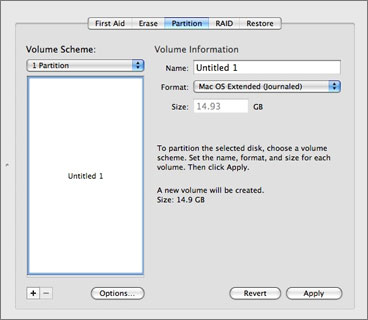
In Recovery Mode, macOS runs a special sort of recovery environment. This allows you to use Disk Utility to wipe your entire drive—or repartition it. Partition Drives and Format Partitions Disk Utility shows internal drives and connected external drives (like USB drives), as well as special image files (DMG files) that you can mount and access as drives. On the left side of the window you’ll see all mounted volumes. RELATED: This annoyingly, but click Views > Show All Devices in the menu bar and you’ll see a tree of drives and their internal partitions. Each “parent” drive is a separate physical drive, while each little drive icon below it is a partition on that drive. To manage your partitions, click a parent drive and select the “Partition” heading.
You can adjust the partitioning layout scheme here. You can also resize, delete, create, rename, and reformat partitions. Note: Many of these operations are destructive, so be sure you have backups first. RELATED: If you want to repartition your system drive, you’ll need to do this from within Recovery Mode, with one exception: APFS volumes., the default on solid state drives as of macOS High Sierra, and it’s got all sorts of clever tricks up its sleeve. One of them: volumes on the same drive pool storage space, meaning you’ll see two separate drives in Finder, but won’t have to manage how much storage space each volume uses. To add a new APFS volume, simply select your system drive, and then click Edit > Add APFS in the menu bar. You’ll see the above prompt. First Aid Repairs File System Problems RELATED: If a hard drive is acting up, Disk Utility’s First Aid function is the first thing you should try.
This feature checks the file system for errors and attempts to correct them, all without much intervention from you. Simply click the drive you want to check, then click the “First Aid” button. Be warned that these checks can take a while, and running them on your system drive will leave you with an unresponsive computer until it’s done. Secure-Erase a Partition or Drive The Erase button allows you to erase an entire hard disk or partition. You can also choose to only erase its free space. You can use this feature to. Click a drive, then click the “Erase” button, then click “Security Options” to select a number of passes to overwrite the drive with., but you can always do a few more if you feel like it. The maximum number is unnecessary. Note that this feature will only be useful on mechanical drives, as you shouldn’t be able to recover deleted data from a solid state drive.